The Spiral Abyss enemy lineup rotated on 16 September 2026, and within a day Floor 11 had produced the loudest Abyss threads of the year. One of them, titled simply "Floor 11 rn," collected more than 5,500 upvotes. Players who have three-starred every reset since Inazuma were suddenly posting clear requests.
The reason is not that Floor 11 got harder in the usual sense. It is that Chamber 11-1 stopped being the thing almost every Abyss chamber has been for years. Most people are still solving it with the wrong tool.
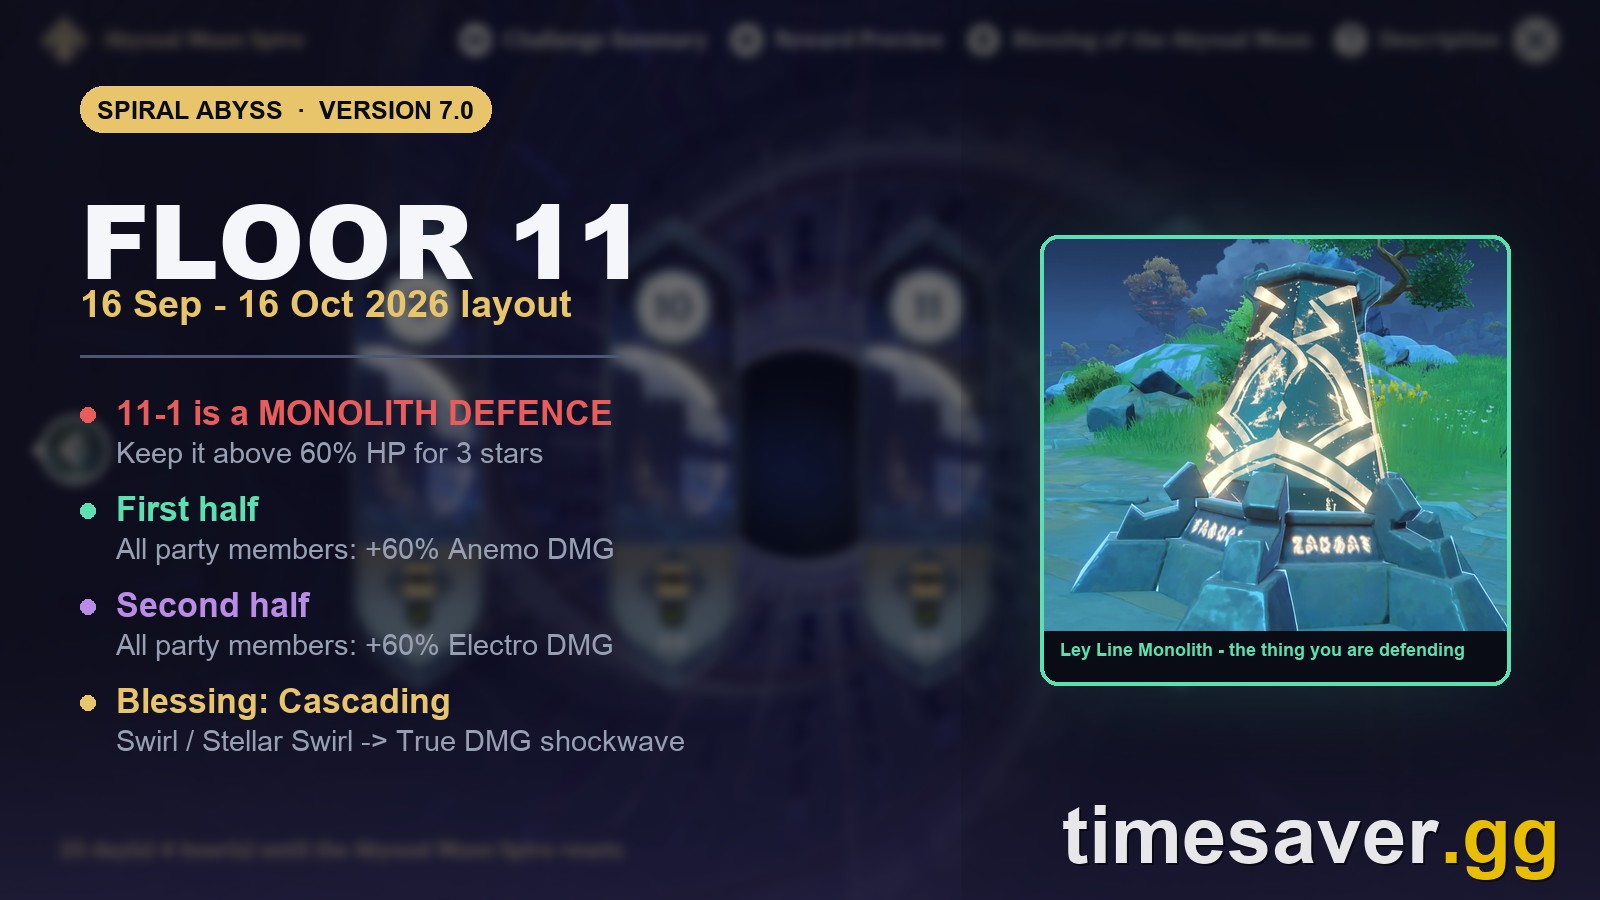
Quick answer: Chamber 11-1 is a Ley Line Monolith defence. Its stars are awarded on "target defence progress greater than 20% / 40% / 60%" — the Monolith's remaining health, not a clear time. You are not racing a timer in that chamber, so raw damage does not fix it. The chamber sends 10 waves of 3 enemies that spawn clockwise around the Monolith, and players report that new spawns aggro the nearest target, which is frequently the Monolith rather than you. The clears being posted lean on taunts, Anemo grouping and freeze rather than raw damage. The Ley Line Disorder gives +60% Anemo DMG in the first half and +60% Electro DMG in the second, and this cycle's Blessing of the Abyssal Moon, Cascading, adds a True DMG shockwave on Swirl or Stellar Swirl every 4 seconds. This layout is live from 16 September 2026 until the 16 October reset.
Article status: verified 17 September 2026 against the live Version 7.0 Abyss. The chamber objectives, enemy names, counts and character levels below are transcribed from the in-game domain text for the 16 September 2026 rotation. The wave structure is corroborated by Game8's Version 7.0 Floor 11 guide, and the behavioural details by converging first-hand reports across six separate threads on r/Genshin_Impact and r/GenshinImpactTips in the 24 hours after the reset. Version 7.0 "Everwinter Without Mercy" is still the live version as this is written; Version 7.1 arrives on 23 September, and it does not reset this enemy layout.
One caveat worth stating plainly: HoYoverse does not publish the Spiral Abyss enemy lineup anywhere outside the game itself. There is no official webpage for it. Every source on the internet, including this one, is transcribing in-game text. We have flagged below which claims are transcription and which are player observation.
Why is Floor 11 suddenly so hard in Version 7.0?
Because Chamber 11-1 changed its scoring condition, and most builds are optimised for the old one.
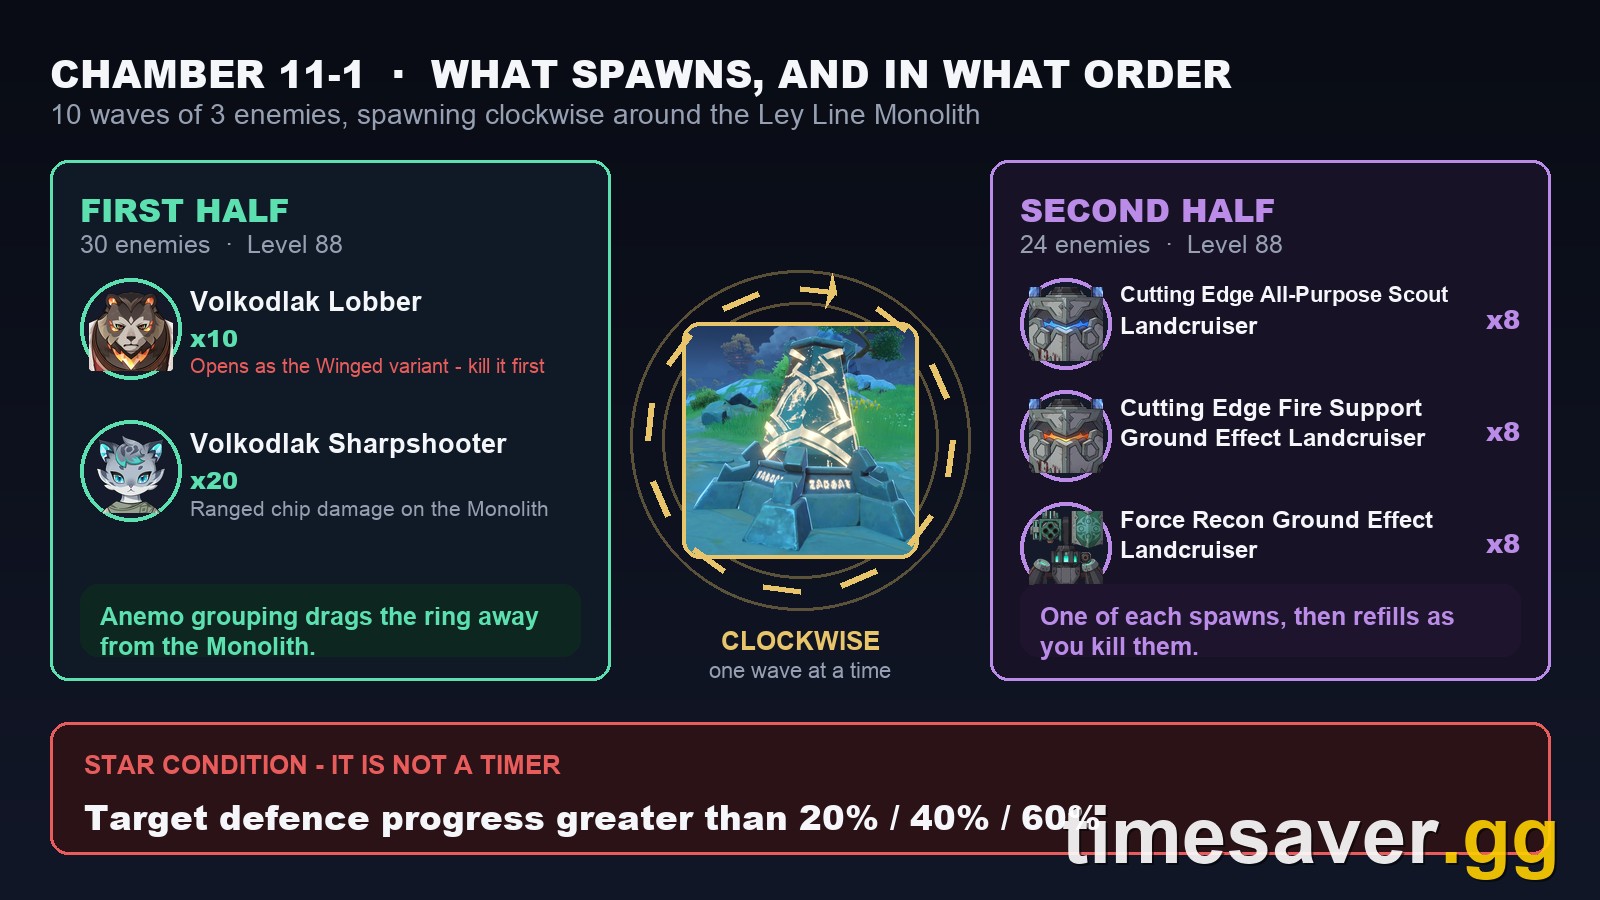
A normal Abyss chamber reads "Remaining challenge time longer than 180 / 300 / 420 sec." You kill fast, you get stars. Chamber 11-1 in this rotation reads "Target defence progress greater than 20% / 40% / 60%." That is the Ley Line Monolith's health bar. You can take as long as you like. What you cannot do is let enemies hit the Monolith.
That single swap inverts the skill being tested. Damage still matters, but only as a means of removing threats before they reach the objective. A team that deletes one enemy per second while three others walk past it into the Monolith will score worse than a team that does half the damage and holds aggro. The comment that best captures the mental shift came from a player answering a clear request on r/GenshinImpactTips:
"try a freeze team with maybe some kind of grouping (Kazuha, Succrose, Venti) if you can't kill the enemies fast. don't forget, that during 11-1 you are not on a timer. you just need to make sure the enemies are not attacking."
That is the whole chamber in three sentences.
What enemies are in Spiral Abyss Chamber 11-1?
Chamber 11-1 runs at Level 88 in both halves, and the two halves send completely different rosters.
First half — 30 enemies total. Twenty Volkodlak Sharpshooters and ten Volkodlak Lobbers. The chamber opens by spawning one Winged Volkodlak Lobber and two Volkodlak Sharpshooters, with more arriving as the previous ones die. The Sharpshooters are ranged, which is exactly the problem: they can chip the Monolith from distance without ever walking into your damage.
Second half — 24 enemies total. Eight Cutting Edge All-Purpose Scout Landcruisers, eight Cutting Edge Fire Support Ground Effect Landcruisers, and eight Force Recon Ground Effect Landcruisers. It opens with one of each and refills the same way.
The spawn pattern is the part worth memorising. Game8's Version 7.0 Floor 11 guide describes the chamber as 10 waves of 3 enemies each, spawning clockwise around the Monolith, and players independently arrived at the same conclusion within hours of the reset:
"They usually spawn in a clockwise pattern, so if you learn where they spawn, you should be able to aggro them before they attack"
That is an enormous practical advantage. If the next spawn point is predictable, you can be standing on it. Being early is worth more than being strong in this chamber.
The aggro mechanic underneath it also got worked out quickly. As one player put it while diagnosing why Itto's Ushi was not holding the line: "the new spawns will aggro the nearest thing, which may be the monolith and not you, so you will have to reaggro them consistently." Ushi does taunt, but at roughly ten seconds of uptime it expires between waves and leaves the gap that kills runs.
What are the Ley Line Disorders on Floor 11 in 7.0?
Floor 11 carries two, one per half, and they are unusually generous:
- First half: all party members gain a 60% Anemo DMG Bonus.
- Second half: all party members gain a 60% Electro DMG Bonus.
The split is confirmed by the in-game floor text and matches third-party coverage, which points first-half teams toward Anemo and second-half teams toward Electro reactions such as Overload and Lunar-Charged.
Pair that with this cycle's Blessing of the Abyssal Moon, "Cascading", which runs on the same 16 September to 16 October window:
"When a character deals Swirl or Stellar Swirl DMG to an opponent, a shockwave will be unleashed at the opponent's position, dealing True DMG. This effect can be triggered once every 4s."
And then look at Floor 12, whose first half boosts Swirl DMG by 200% and Stellar-Swirl DMG by 75%, while the second half boosts Electro-Charged by 200% and Lunar-Charged by 75%.

Read those three together and the design intent is obvious: this is a Swirl rotation with an Electro second half. An Anemo grouper on Floor 11 first half is doing four jobs simultaneously — it swirls into Cascading for free True DMG, it consumes the 60% Anemo bonus, it carries directly over into Floor 12's 200% Swirl multiplier, and it physically drags spawns away from the Monolith. Very few Abyss cycles align that cleanly.
What are the best teams for Floor 11 in Version 7.0?
There is no single mandatory team, and anyone telling you there is has not read the chamber. What the clear reports converge on is a function, not a name: something that holds enemy attention, or moves enemies, or stops them moving.
Three approaches are showing up repeatedly in successful clears:
Taunt. Players report that Alyosha's burst taunts these enemies, and that it works at C0 — one noted clearing with C0 Alyosha and recommended the cheap fix of "2pc 2pc ER% and fav lance on alyosha for the burst, its fine." Energy Recharge matters more than damage stats here, because the taunt needs to be up for every wave rather than every other one. Ororon and Lynette also taunt. Itto's Ushi technically does, but its short duration makes it unreliable across the wave cadence.
Group. Kazuha, Sucrose or Venti pulling spawns into a pile away from the Monolith solves the problem geometrically and feeds the Anemo disorder and the Cascading blessing at the same time. This is the highest-value option in the first half.
Freeze. A frozen enemy is not attacking the objective, and freeze does not care about your damage ceiling — which is why it keeps appearing in clear posts from players who could not brute-force the chamber. Be aware that this is the one recommendation the community is split on: several players report freeze carrying the chamber, others report the crowd-control windows being too short to matter across ten waves. Nobody has published a controlled test, so treat it as an option to try rather than a fix.
On specific line-ups, the reported clears skew toward Sandrone teams and toward Bina, Ineffa, Sucrose and Flins compositions. Several players described failing repeatedly with a damage-first Flins team and then clearing after switching to Sandrone — which is a control story, not a power-level story. If you already own the units, build for uptime and crowd control before you build for numbers.
The kill priority players keep converging on is the airborne Lobber first, then the Sharpshooters — which tracks with the chamber text, since the Winged Lobber is the enemy the first half opens with. Ranged and flying enemies are the ones that can damage the Monolith without walking into your area of effect.
What about Chambers 11-2 and 11-3?
These are ordinary timed chambers, and most players are not struggling with them. Full transcription:
| Chamber | Level | Star condition | First half | Second half |
|---|---|---|---|---|
| 11-1 | 88 | Defence progress above 20 / 40 / 60% | Volkodlak Sharpshooter x20, Volkodlak Lobber x10 | Three Landcruiser types, 8 each |
| 11-2 | 90 | Time remaining above 60 / 180 / 300 sec | Eremite Stone Enchanter, then Glacial Warden and 2 Glaciomancers, then Rugged Elder Leshy and 2 Juvenile Tree Segments | Tainted Water-Splitting Phantasm, then Veteran Tainted Water-Spouting Phantasm |
| 11-3 | 92 | Time remaining above 180 / 300 / 420 sec | Construction Specialist Mek - Ousia, then Ruin Drake: Earthguard | Wilderness Exile x2, then Wilderness Hunter |
Note the asymmetry in 11-2: its three-star bar is 300 seconds remaining, against 11-3's 420. Chamber 11-2 is the tighter damage check of the two despite the lower enemy level, mostly because the first half stacks three separate enemy groups in sequence.
How long is this Floor 11 layout live?
From 04:00 server time on 16 September 2026 until 03:59 server time on 16 October 2026. The Abyss enemy lineup rotates on the 16th of each month, and the Blessing of the Abyssal Moon changes on the same schedule.
This is the detail most people get wrong, and it changes whether the chamber is worth learning. The twice-monthly reset on the 1st and 16th that clears your star progress is not the same event as the enemy rotation. This particular Floor 11 survives the 1 October reset and the Version 7.1 update on 23 September. You will face it at least twice more, which makes the half hour of learning the spawn ring a genuinely good investment rather than a one-off tax.
If you want the rest of the month mapped out, the September banner schedule covers which characters leave and when, the Imaginarium Theater rotation covers the other monthly endgame mode, and the current Genshin Impact codes are worth grabbing before they expire.
Frequently Asked Questions
Is Floor 11 in Version 7.0 a DPS check? No, and that is why it is catching experienced players. Chamber 11-1 scores on the Ley Line Monolith's remaining health, with thresholds at 20%, 40% and 60% for one, two and three stars. There is no clear-time requirement in that chamber. Chambers 11-2 and 11-3 are conventional timed chambers.
Which enemies spawn first in Chamber 11-1? In the first half, the in-game text specifies one Winged Volkodlak Lobber and two Volkodlak Sharpshooters, with replacements arriving as those die. In the second half it is one of each of the three Landcruiser types. Kill the airborne enemy first in both cases.
Do the enemies really spawn clockwise? Game8's Version 7.0 guide describes 10 waves of 3 enemies spawning clockwise around the Monolith, and multiple players reported independently arriving at the same pattern and using it to pre-position. Treat it as reliable but verify it on your first run, since HoYoverse does not publish spawn tables.
Does Alyosha's taunt work at C0? Players report yes. The common recommendation is to build Energy Recharge — a two-piece and two-piece Energy Recharge set with Favonius Lance — so the burst is available for every wave rather than every second wave.
Does the Version 7.1 update change this Abyss layout? No. Version 7.1 arrives on 23 September 2026, but the enemy lineup runs on the monthly 16th-of-the-month rotation and stays in place until 16 October 2026.
What is the Blessing of the Abyssal Moon this cycle? It is called Cascading. When a character deals Swirl or Stellar Swirl damage to an opponent, a shockwave is unleashed at that opponent's position dealing True DMG, once every 4 seconds. It runs on the same 16 September to 16 October window.
Is Floor 12 also Anemo-focused? Its first half boosts Swirl DMG by 200% and Stellar-Swirl DMG by 75%, so yes for the first half. The second half switches to Electro-Charged at 200% and Lunar-Charged at 75%. Floor 12 runs at Levels 95, 98 and 100.
The short version
Stop treating Chamber 11-1 as a damage problem. It is an objective-defence problem wearing an Abyss chamber's clothes. Learn where the clockwise ring spawns, bring one unit that can taunt, group or freeze, and let the 60% Anemo bonus and the Cascading blessing do the damage work for you. The layout is yours until 16 October 2026.
Want more of your Genshin time back? We write these breakdowns because grinding is the worst part of a great game.